· 27 min read
The MCP TypeScript SDK: A Complete Guide to Tools, Resources, Prompts, and Beyond
Go beyond the basics of MCP server development. A comprehensive guide to the official TypeScript SDK — architecture, tools, resources, prompts, sampling, completions, and more.
Copy a command, then paste it into the command palette (Ctrl K to open).
Introduction
AI models are powerful, but they're isolated. They can answer questions, generate code, and analyze text, but they can't fetch live data, access your APIs, or interact with external systems. Every time you need an AI to do something in the real world, you're stuck bridging the gap yourself.
MCP (Model Context Protocol) solves this. It's an open standard that gives AI models a universal way to discover, understand, and use external tools and data sources. Think of it as USB for AI: a single protocol that lets any AI model plug into any tool you build.
Originally created by Anthropic and now maintained by the Agentic AI Foundation (backed by Anthropic, Google, OpenAI, and others), MCP is quickly becoming the standard way AI interacts with the outside world.
Why TypeScript?
The MCP TypeScript SDK is the Tier 1 official SDK, meaning it's the most feature-complete, best-supported implementation available. With over 66 million npm downloads and 27,000+ dependent packages, it has the largest ecosystem of any MCP SDK. If you're building MCP servers, TypeScript gives you the best tooling, type safety, and community support.
This guide covers the complete SDK, not just the basics. You'll learn every major concept: from the architecture of the SDK itself to advanced features like sampling (server-initiated LLM calls), autocompletion, and structured logging.
What you'll learn:
- The SDK's two-layer architecture (McpServer vs Server) and when to use each
- How to define tools with Zod validation, annotations, and structured error handling
- How to expose static resources and dynamic resource templates
- How to create reusable prompts with arguments
- How to use sampling for server-initiated LLM calls
- How to implement completions, roots, logging, and notifications
- How to choose and configure transports (stdio, Streamable HTTP)
Prerequisites:
- Node.js 20 or later
- Basic TypeScript familiarity
Project Setup
The fastest way to get started is with create-mcp-server, a CLI that scaffolds production-ready MCP servers:
npx @agentailor/create-mcp-server --name=my-mcp-server
The CLI generates a complete TypeScript project with the transport layer, session management, and a starter tool already configured. For a full walkthrough of the scaffolding process, see Create Your First MCP Server in 5 Minutes.
Manual Setup
If you prefer to set things up yourself, start with a new project and install the core dependencies:
mkdir my-mcp-server && cd my-mcp-server
npm init -y
npm install @modelcontextprotocol/sdk zod express
npm install -D typescript @types/node @types/express tsx
Initialize TypeScript:
npx tsc --init
SDK Import Paths
The SDK uses deep imports to keep bundles small. Here are the most common paths:
// Server classes
import { McpServer } from '@modelcontextprotocol/sdk/server/mcp.js'
import { Server } from '@modelcontextprotocol/sdk/server/index.js'

// Transports
import { StdioServerTransport } from '@modelcontextprotocol/sdk/server/stdio.js'
import { StreamableHTTPServerTransport } from '@modelcontextprotocol/sdk/server/streamableHttp.js'

// Types
import type {
  CallToolResult,
  GetPromptResult,
  ReadResourceResult,
} from '@modelcontextprotocol/sdk/types.js'

// Utilities
import { ResourceTemplate } from '@modelcontextprotocol/sdk/server/mcp.js'

import { completable } from '@modelcontextprotocol/sdk/server/completable.js'
SDK Architecture: McpServer vs Server
The SDK covers both sides of the protocol: building servers (exposing tools, resources, and prompts) and building clients (connecting to servers and consuming their capabilities). This guide focuses on the server side, which is what most developers need. We'll cover the client SDK in a future article.
The server SDK is built in two layers. Understanding this distinction helps you choose the right level of abstraction for your project.
The Two-Layer Design
McpServer is the high-level API. It provides ergonomic methods like registerTool(), registerResource(), and registerPrompt(). It automatically handles capability negotiation, request routing, and input validation. This is what most developers should use.
Server is the low-level protocol handler that McpServer wraps internally. It gives you raw access to the MCP protocol with setRequestHandler(), letting you handle any message type directly. You'd use this for custom protocol extensions or advanced scenarios where you need full control.
Here's the same tool registered on each:
McpServer (high-level):
import { McpServer } from '@modelcontextprotocol/sdk/server/mcp.js'
import { z } from 'zod'

const server = new McpServer({
  name: 'my-server',
  version: '1.0.0',
})

server.registerTool(
  'greet',
  {
    description: 'Greet a user by name',
    inputSchema: {
      name: z.string().describe('The name to greet'),
    },
  },
  async ({ name }) => ({
    content: [{ type: 'text', text: `Hello, ${name}!` }],
  })
)
Server (low-level):
import { Server } from '@modelcontextprotocol/sdk/server/index.js'
import { CallToolRequestSchema, ListToolsRequestSchema } from '@modelcontextprotocol/sdk/types.js'

const server = new Server({ name: 'my-server', version: '1.0.0' }, { capabilities: { tools: {} } })

server.setRequestHandler(ListToolsRequestSchema, async () => ({
  tools: [
    {
      name: 'greet',
      description: 'Greet a user by name',
      inputSchema: {
        type: 'object',
        properties: {
          name: { type: 'string', description: 'The name to greet' },
        },
        required: ['name'],
      },
    },
  ],
}))

server.setRequestHandler(CallToolRequestSchema, async (request) => {
  if (request.params.name === 'greet') {
    const { name } = request.params.arguments as { name: string }
    return {
      content: [{ type: 'text', text: `Hello, ${name}!` }],
    }
  }
  throw new Error('Tool not found')
})
The difference is clear. McpServer handles tool listing, request routing, input validation, and JSON Schema conversion automatically. With Server, you manage all of that yourself.
Capability Negotiation
When a client connects to your server, the first thing that happens is the initialize handshake. The client sends an initialize request, and the server responds with its capabilities: which features it supports (tools, resources, prompts, logging, etc.).
With McpServer, capabilities are inferred automatically from what you register. If you call registerTool(), the server advertises tool support. If you call registerResource(), it advertises resource support. You don't need to declare anything upfront.
With Server, you must declare capabilities explicitly in the constructor:
const server = new Server(
  { name: 'my-server', version: '1.0.0' },
  {
    capabilities: {
      tools: {},
      resources: {},
      prompts: {},
      logging: {},
    },
  }
)
If you forget to declare a capability, the client won't know about it, and requests for that feature will fail.
When to Use Which
| Criteria | McpServer | Server |
|---|---|---|
| Standard tools/resources | Recommended | Works, more verbose |
| Custom protocol extensions | Not supported | Required |
| Capability negotiation | Automatic | Manual |
| Input validation | Built-in (Zod) | Manual |
| Learning curve | Gentle | Steeper |
| Flexibility | Sensible defaults | Full customization |
Use McpServer unless you have a specific reason not to. The rest of this guide uses McpServer for all examples.
Tools
Tools are the most common MCP capability. They define actions that AI models can perform: fetching data, writing files, querying databases, sending emails, or anything else your server can do.
Basic Tool Registration
The registerTool() method takes three arguments: a name, metadata (description + input schema), and a handler function.
import fs from 'fs/promises'
import { McpServer } from '@modelcontextprotocol/sdk/server/mcp.js'
import { z } from 'zod'

const server = new McpServer({ name: 'file-server', version: '1.0.0' })

server.registerTool(
  'read_file',
  {
    description: `Read the contents of a file from the filesystem.

Use this tool when you need to:
- Examine source code or configuration files
- Read log files for debugging
- Access any text-based file`,
    inputSchema: {
      path: z.string().describe('Absolute path to the file to read'),
      encoding: z
        .enum(['utf-8', 'ascii', 'base64'])
        .default('utf-8')
        .describe('File encoding to use'),
    },
  },
  async ({ path, encoding }) => {
    const content = await fs.readFile(path, encoding)
    return {
      content: [{ type: 'text', text: content }],
    }
  }
)
Two things to note:
Descriptions matter. The tool description and the
.describe()on each parameter are what the AI reads to decide when and how to use your tool. Be specific about what the tool does and when to use it.Zod schemas convert automatically. The SDK transforms your Zod schema into JSON Schema for the MCP protocol wire format. You write TypeScript, the client receives standard JSON Schema.
Input Validation with Zod
The SDK uses Zod for input validation. Zod schemas are validated automatically before your handler is called, so you can trust that the inputs match your schema.
Here are some common patterns:
server.registerTool(
  'search',
  {
    description: 'Search for items with filters',
    inputSchema: {
      // Basic types
      query: z.string().min(1).describe('Search query'),
      limit: z.number().int().positive().max(100).default(10).describe('Max results'),
      includeArchived: z.boolean().default(false).describe('Include archived items'),

      // Enums for constrained choices
      sortBy: z.enum(['relevance', 'date', 'name']).default('relevance').describe('Sort order'),

      // Optional fields
      category: z.string().optional().describe('Filter by category'),

      // Arrays
      tags: z.array(z.string()).default([]).describe('Filter by tags'),

      // Custom validation
      dateRange: z
        .object({
          start: z.string().date().describe('Start date (YYYY-MM-DD)'),
          end: z.string().date().describe('End date (YYYY-MM-DD)'),
        })
        .optional()
        .describe('Filter by date range'),
    },
  },
  async (args) => {
    // args is fully typed and validated
    const results = await performSearch(args)
    return {
      content: [{ type: 'text', text: JSON.stringify(results, null, 2) }],
    }
  }
)
Structured Error Handling
There are two ways to handle errors in MCP tools, and they serve different purposes.
Domain errors (for the AI to handle): Return isError: true in your response. The AI sees the error message and can decide what to do, like retry with different parameters or inform the user.
server.registerTool(
  'get_user',
  {
    description: 'Get user profile by ID',
    inputSchema: {
      userId: z.string().describe('The user ID to look up'),
    },
  },
  async ({ userId }) => {
    const user = await db.users.findById(userId)

    if (!user) {
      return {
        content: [
          {
            type: 'text',
            text: `User "${userId}" not found. Verify the ID is correct or try searching by name instead.`,
          },
        ],
        isError: true,
      }
    }

    return {
      content: [{ type: 'text', text: JSON.stringify(user, null, 2) }],
    }
  }
)
Protocol errors (for the client to handle): Throw McpError for issues that indicate a problem with the request itself, like invalid parameters or unsupported operations.
import { McpError, ErrorCode } from '@modelcontextprotocol/sdk/types.js'

server.registerTool(
  'delete_record',
  {
    description: 'Delete a record by ID',
    inputSchema: {
      id: z.string().describe('Record ID'),
      confirm: z.boolean().describe('Must be true to confirm deletion'),
    },
  },
  async ({ id, confirm }) => {
    if (!confirm) {
      throw new McpError(ErrorCode.InvalidParams, 'Deletion requires confirm: true')
    }

    await db.records.delete(id)
    return {
      content: [{ type: 'text', text: `Record ${id} deleted.` }],
    }
  }
)
When to use which:
| Scenario | Approach |
|---|---|
| Record not found | isError: true (domain) |
| API rate limit exceeded | isError: true (domain) |
| Missing required confirmation | McpError (protocol) |
| Unsupported operation | McpError (protocol) |
| External service timeout | isError: true (domain) |
The rule of thumb: if the AI can do something useful with the error message (retry, adjust, inform), use isError: true. If the request itself is fundamentally wrong, throw McpError.
Tool Annotations
Tool annotations are metadata hints that help clients decide how to present and handle your tools. They don't affect execution, but they improve the user experience.
server.registerTool(
  'list_files',
  {
    description: 'List files in a directory',
    inputSchema: {
      path: z.string().describe('Directory path'),
    },
    annotations: {
      readOnlyHint: true, // This tool only reads data
      destructiveHint: false, // No destructive side effects
      idempotentHint: true, // Same input always gives same output
      openWorldHint: false, // Operates on local resources only
    },
  },
  async ({ path }) => {
    // implementation
  }
)

server.registerTool(
  'delete_file',
  {
    description: 'Delete a file from the filesystem',
    inputSchema: {
      path: z.string().describe('Path to the file to delete'),
    },
    annotations: {
      readOnlyHint: false,
      destructiveHint: true, // This deletes data
      idempotentHint: true, // Deleting twice has same effect
      openWorldHint: false,
    },
  },
  async ({ path }) => {
    // implementation
  }
)
| Annotation | Purpose |
|---|---|
readOnlyHint | Tool only reads, never modifies state |
destructiveHint | Tool may delete or irreversibly modify data |
idempotentHint | Calling multiple times with same args has same effect |
openWorldHint | Tool interacts with external/open-world resources |
Clients may use these hints to show confirmation dialogs before destructive operations or to batch read-only calls more aggressively.
For more on designing effective tools, see Writing Effective Tools for AI Agents.
Resources
Resources expose read-only data that AI models can access. While tools perform actions, resources provide context: configuration files, database records, API documentation, or any data the AI might need.
Static Resources
Use registerResource() to expose a resource at a fixed URI:
server.registerResource(
  'server-config',
  'config://server',
  {
    description: 'Current server configuration',
    mimeType: 'application/json',
  },
  async (uri) => ({
    contents: [
      {
        uri: uri.href,
        mimeType: 'application/json',
        text: JSON.stringify(
          {
            maxConnections: 100,
            timeout: 30000,
            environment: process.env.NODE_ENV,
          },
          null,
          2
        ),
      },
    ],
  })
)
The arguments are: a name, a URI string, metadata (description + mimeType), and a handler that returns the resource contents.
Resource Templates
Resource templates are one of the SDK's more powerful features. They define dynamic resources with parameterized URIs, so a single template can serve many different resources.
import { ResourceTemplate } from '@modelcontextprotocol/sdk/server/mcp.js'

server.registerResource(
  'user-profile',
  new ResourceTemplate('users://{userId}/profile', { list: undefined }),
  {
    description: 'User profile data by user ID',
    mimeType: 'application/json',
  },
  async (uri, { userId }) => {
    const user = await db.users.findById(userId)
    return {
      contents: [
        {
          uri: uri.href,
          mimeType: 'application/json',
          text: JSON.stringify(user, null, 2),
        },
      ],
    }
  }
)
The URI pattern users://{userId}/profile matches any URI like users://123/profile or users://abc/profile. The {userId} parameter is extracted and passed to your handler.
The { list: undefined } option means the template doesn't provide a way to list all possible values. If you can enumerate the available resources, provide a list callback instead:
new ResourceTemplate('users://{userId}/profile', {
  list: async () => {
    const users = await db.users.findAll()
    return users.map((user) => ({
      uri: `users://${user.id}/profile`,
      name: `Profile: ${user.name}`,
    }))
  },
})
Resource List Changed Notifications
When the set of available resources changes at runtime (new resources added, old ones removed), you can notify connected clients:
// After adding a new resource dynamically
server.sendResourceListChanged()
This tells clients to re-fetch the resource list. Without this notification, clients would only see the resources that existed when they first connected.
Prompts
Prompts are reusable message templates that help AI models use your server effectively. They define structured interactions with pre-filled instructions.
Defining Prompts with Arguments
server.registerPrompt(
  'code-review',
  {
    description: 'Review code for best practices, bugs, and improvements',
    argsSchema: {
      language: z
        .enum(['typescript', 'python', 'go', 'rust'])
        .describe('Programming language of the code'),
      code: z.string().describe('The code to review'),
      focus: z
        .enum(['security', 'performance', 'readability', 'all'])
        .default('all')
        .describe('What aspect to focus the review on'),
    },
  },
  async ({ language, code, focus }) => ({
    messages: [
      {
        role: 'user',
        content: {
          type: 'text',
          text: `Review this ${language} code with a focus on ${focus}:\n\n\`\`\`${language}\n${code}\n\`\`\``,
        },
      },
    ],
  })
)
When a client invokes this prompt, it receives the message array and forwards it to the AI model. The model then has clear instructions on what to do.
Multi-Step Prompts
Prompts can return multiple messages to set up a richer conversation context:
server.registerPrompt(
  'debug-issue',
  {
    description: 'Structured debugging workflow for reported issues',
    argsSchema: {
      error: z.string().describe('The error message or description'),
      context: z.string().optional().describe('Additional context about when the error occurs'),
    },
  },
  async ({ error, context }) => ({
    messages: [
      {
        role: 'user',
        content: {
          type: 'text',
          text: `I'm encountering this error: ${error}${context ? `\n\nContext: ${context}` : ''}`,
        },
      },
      {
        role: 'assistant',
        content: {
          type: 'text',
          text: "I'll help debug this. Let me start by analyzing the error and identifying possible causes.",
        },
      },
      {
        role: 'user',
        content: {
          type: 'text',
          text: 'Please check the relevant logs and source code, then suggest a fix with code examples.',
        },
      },
    ],
  })
)
By including both user and assistant messages, you can guide the model's behavior more precisely than a single prompt would allow.
Sampling: Server-Initiated LLM Calls
Sampling is MCP's most distinctive feature. It flips the traditional flow: instead of a client asking a server to do something, the server asks the client's LLM to generate text.
This enables "agentic servers" that can reason, make decisions, and perform multi-step workflows internally.
How It Works
- Your tool handler calls
server.server.createMessage()during execution - The request is sent to the connected MCP client
- The client forwards it to its LLM (Claude, GPT, etc.)
- The LLM's response is returned to your server
- Your tool uses the response to continue its work
server.registerTool(
  'summarize_url',
  {
    description: 'Fetch a URL and return an AI-generated summary',
    inputSchema: {
      url: z.string().url().describe('URL to fetch and summarize'),
      style: z
        .enum(['brief', 'detailed', 'bullet-points'])
        .default('brief')
        .describe('Summary style'),
    },
  },
  async ({ url, style }, { server: serverInstance }) => {
    // Step 1: Fetch the content
    const response = await fetch(url)
    const html = await response.text()

    // Step 2: Ask the client's LLM to summarize it
    const summary = await serverInstance.createMessage({
      messages: [
        {
          role: 'user',
          content: {
            type: 'text',
            text: `Summarize the following web page content in ${style} style:\n\n${html.slice(0, 10000)}`,
          },
        },
      ],
      maxTokens: 500,
    })

    return {
      content: [
        {
          type: 'text',
          text:
            summary.content.type === 'text' ? summary.content.text : 'Unable to generate summary',
        },
      ],
    }
  }
)
Model Preferences
When requesting a sample, you can express preferences about which model the client should use:
const result = await serverInstance.createMessage({
  messages: [{ role: 'user', content: { type: 'text', text: 'Classify this text...' } }],
  modelPreferences: {
    hints: [{ name: 'claude-3-5-haiku' }, { name: 'claude' }],
    costPriority: 0.8, // Prefer cheaper models
    speedPriority: 0.9, // Prefer faster models
    intelligencePriority: 0.3, // Don't need the smartest model
  },
  maxTokens: 100,
})
The hints array is advisory. The client may ignore it entirely. Priority values range from 0 to 1 and help the client choose between available models.
Safety by Design
Sampling is designed with human-in-the-loop safety. Clients can:
- Show the sampling request to the user before forwarding it to the LLM
- Modify or reject the request
- Review the LLM's response before returning it to the server
Your server should never assume sampling requests will be honored. Always handle the case where sampling fails or is denied.
Completions: Argument Autocompletion
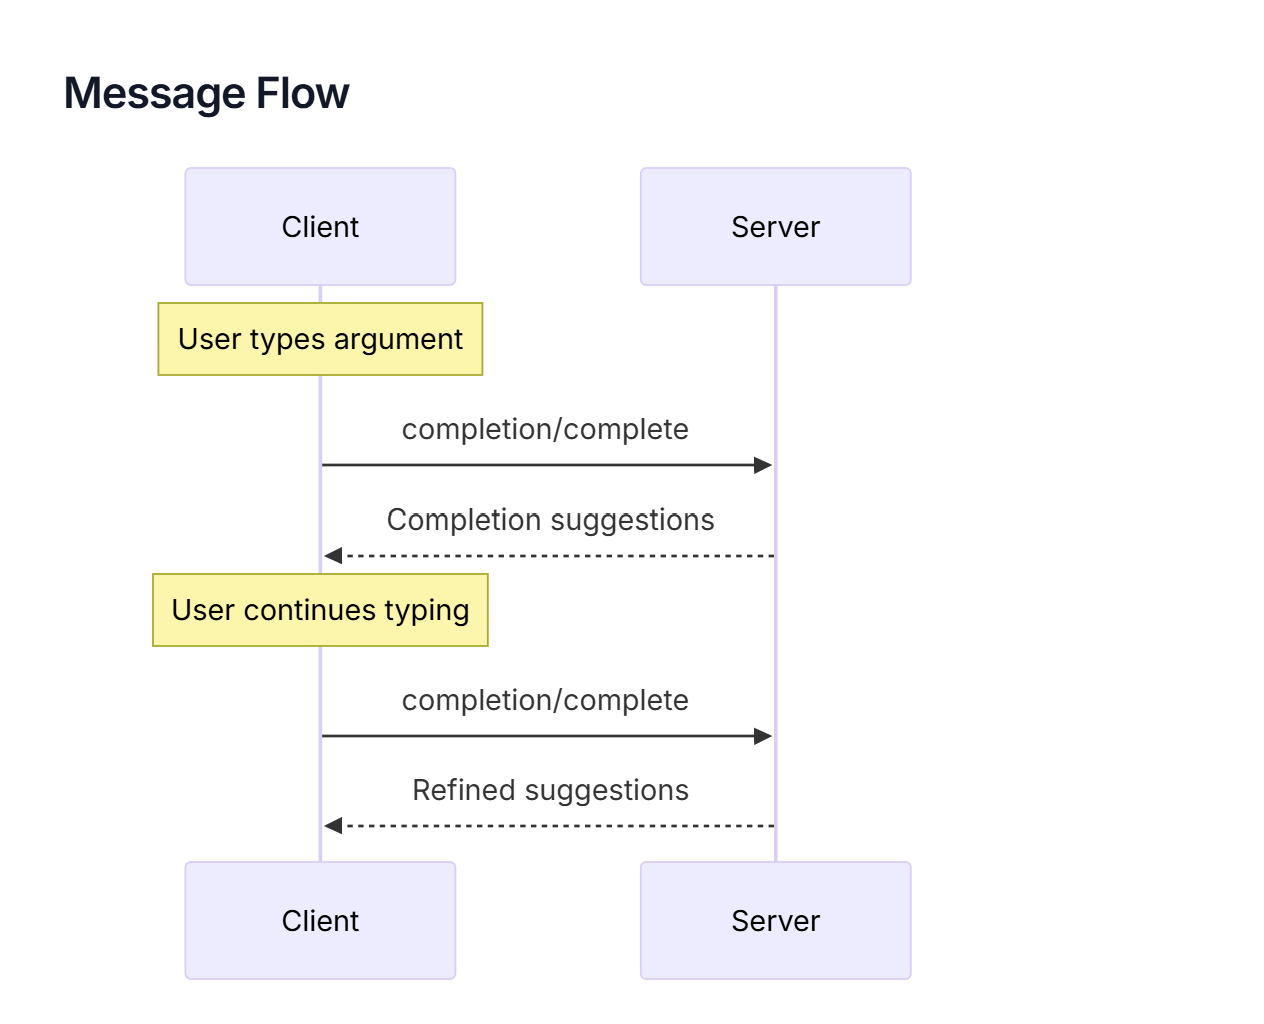
The completable() function adds autocompletion to prompt arguments and resource template parameters. When a client UI shows an input field for a completable argument, it can request suggestions from your server as the user types.
import { completable } from '@modelcontextprotocol/sdk/server/completable.js'

server.registerPrompt(
  'translate',
  {
    description: 'Translate text to a target language',
    argsSchema: {
      language: completable(z.string().describe('Target language'), async (value) => {
        const languages = [
          'English',
          'Spanish',
          'French',
          'German',
          'Japanese',
          'Korean',
          'Chinese',
          'Portuguese',
          'Italian',
          'Dutch',
        ]
        return languages.filter((l) => l.toLowerCase().startsWith(value.toLowerCase()))
      }),
      text: z.string().describe('Text to translate'),
    },
  },
  async ({ language, text }) => ({
    messages: [
      {
        role: 'user',
        content: {
          type: 'text',
          text: `Translate the following text to ${language}:\n\n${text}`,
        },
      },
    ],
  })
)
Completions also work with resource templates:
server.registerResource(
  'project-docs',
  new ResourceTemplate('docs://{projectName}/{docType}', {
    list: undefined,
  }),
  {
    description: 'Project documentation',
    mimeType: 'text/markdown',
  },
  async (uri, { projectName, docType }) => {
    // handler
  }
)
The completion callback receives the current input value and returns an array of matching suggestions. Keep the callback fast, as it may be called on every keystroke.
Roots: Session-Scoped Context
Roots are URIs that the client provides to define the boundaries of what your server should operate on. They answer the question: "What am I working with?"
For example, a code analysis server might receive roots like file:///home/user/my-project, telling it which directory to scan. A documentation server might receive https://docs.example.com/v2, scoping it to a specific version.
Reading Roots
Access roots from within a tool handler using the server instance:
server.registerTool(
  'scan_project',
  {
    description: 'Scan the project for issues',
    inputSchema: {},
  },
  async (_args, { server: serverInstance }) => {
    const { roots } = await serverInstance.listRoots()

    if (roots.length === 0) {
      return {
        content: [
          {
            type: 'text',
            text: 'No project roots configured. Ask the user to set a root directory.',
          },
        ],
        isError: true,
      }
    }

    const results = []
    for (const root of roots) {
      results.push(`Scanning: ${root.uri} (${root.name || 'unnamed'})`)
      // Perform analysis on each root...
    }

    return {
      content: [{ type: 'text', text: results.join('\n') }],
    }
  }
)
Roots are session-scoped. Different clients connected to the same server may have different roots. Clients can also send a rootsChanged notification when roots are updated during a session.
Logging
The SDK provides structured logging that flows from your server to the connected client. This is different from console.log: log messages are sent over the MCP protocol and can be displayed, filtered, and stored by the client.
const server = new McpServer(
  { name: 'my-server', version: '1.0.0' },
  { capabilities: { logging: {} } }
)

server.registerTool(
  'process_data',
  {
    description: 'Process a dataset',
    inputSchema: {
      datasetId: z.string().describe('Dataset identifier'),
    },
  },
  async ({ datasetId }, { log }) => {
    log.info(`Starting processing for dataset: ${datasetId}`)

    try {
      const data = await fetchDataset(datasetId)
      log.debug(`Loaded ${data.length} records`)

      const result = await transform(data)
      log.info(`Processing complete: ${result.processedCount} records transformed`)

      return {
        content: [{ type: 'text', text: JSON.stringify(result, null, 2) }],
      }
    } catch (error) {
      log.error(`Processing failed: ${error.message}`)
      return {
        content: [{ type: 'text', text: `Processing failed: ${error.message}` }],
        isError: true,
      }
    }
  }
)
Available log levels, from least to most severe: debug, info, notice, warning, error, critical, alert, emergency.
Clients can set a minimum log level using the logging/setLevel protocol method. Your server should respect this, but the SDK handles the filtering automatically.
Note: For stdio servers, never use
console.log()for debugging. Stdout is reserved for the MCP protocol. Useconsole.error()instead, or better yet, use the SDK's logging API to send log messages to the client.
Notifications
Notifications are one-way messages from your server to connected clients. Unlike tool responses, they're not replies to a request. They proactively inform clients about changes.
List Changed Notifications
When your server's available tools, resources, or prompts change at runtime, notify clients so they can refresh:
// Dynamically add a tool based on runtime conditions
server.registerTool(
  'new_capability',
  {
    /* ... */
  },
  async () => {
    /* ... */
  }
)
server.sendToolListChanged()

// Same for resources and prompts
server.sendResourceListChanged()
server.sendPromptListChanged()
Progress Notifications
For long-running tools, send progress updates so clients can show a progress indicator:
server.registerTool(
  'bulk_import',
  {
    description: 'Import records from a CSV file',
    inputSchema: {
      filePath: z.string().describe('Path to the CSV file'),
    },
  },
  async ({ filePath }, { reportProgress }) => {
    const records = await parseCSV(filePath)
    const total = records.length
    let processed = 0

    for (const record of records) {
      await importRecord(record)
      processed++
      await reportProgress({ progress: processed, total })
    }

    return {
      content: [{ type: 'text', text: `Imported ${processed} records.` }],
    }
  }
)
The client receives progress updates and can display them to the user. The progress and total fields let clients render a percentage or progress bar.
Transports
Transports define how clients and servers communicate. The SDK supports two active transport mechanisms.
Stdio Transport
The simplest transport. Your server runs as a subprocess, and the client communicates through stdin/stdout pipes.
import { McpServer } from '@modelcontextprotocol/sdk/server/mcp.js'
import { StdioServerTransport } from '@modelcontextprotocol/sdk/server/stdio.js'

const server = new McpServer({ name: 'my-server', version: '1.0.0' })

// Register tools, resources, prompts...

const transport = new StdioServerTransport()
await server.connect(transport)
console.error('Server running on stdio') // stderr only!
Stdio is ideal for local tools integrated into editors like VS Code or Claude Desktop. The server starts when the client needs it and stops when the session ends. No network configuration, no ports, no URLs.
Streamable HTTP Transport
The modern transport for remote and shared servers. Your server runs as an HTTP service, and clients connect over the network.
import { McpServer } from '@modelcontextprotocol/sdk/server/mcp.js'
import { StreamableHTTPServerTransport } from '@modelcontextprotocol/sdk/server/streamableHttp.js'
import { createMcpExpressApp } from '@modelcontextprotocol/sdk/server/express.js'

const app = createMcpExpressApp({
  allowedHosts: ['localhost', '127.0.0.1', '[::1]'],
})

const server = new McpServer({ name: 'my-server', version: '1.0.0' })

// Register tools, resources, prompts...

// The transport handles sessions, SSE streaming, and routing
app.post('/mcp', async (req, res) => {
  const transport = new StreamableHTTPServerTransport({ sessionIdGenerator: () => randomUUID() })
  await server.connect(transport)
  await transport.handleRequest(req, res)
})

app.listen(3000, () => console.log('Server running on http://localhost:3000/mcp'))
Tip: Rather than setting up the transport manually, use
create-mcp-serverto scaffold a complete Streamable HTTP server with session management already configured. See Create Your First MCP Server in 5 Minutes for a full walkthrough.
For deploying your server to production, see Deploy Your MCP Server to Google Cloud Run.
SSE Transport (Legacy)
Server-Sent Events was the original remote transport for MCP. It uses two endpoints: HTTP POST for client requests and a separate SSE endpoint for server responses.
The protocol has moved to Streamable HTTP, which unifies everything into a single endpoint. Use Streamable HTTP for new projects. SSE is still available for backwards compatibility with older clients.
Transport Comparison
| Transport | Use Case | Sessions | Deployment |
|---|---|---|---|
| Stdio | Local editor integration | Single | Local only |
| Streamable HTTP | Remote servers, APIs, teams | Multi-session | Cloud-ready |
| SSE (Legacy) | Older client compatibility | Limited | Not recommended |
Error Handling
McpError and Error Codes
The SDK provides McpError for protocol-level errors. These are errors that indicate something is wrong with the request itself, not with the operation the tool tried to perform.
import { McpError, ErrorCode } from '@modelcontextprotocol/sdk/types.js'
The available error codes:
| Error Code | When to Use |
|---|---|
InvalidRequest | The request is malformed |
MethodNotFound | The requested method doesn't exist |
InvalidParams | Parameters fail validation |
InternalError | Unexpected server error |
Best Practices
When writing error messages for MCP tools, remember that the AI model reads them. Make errors actionable: tell the model what went wrong and what to try instead.
// Bad: generic error
return { content: [{ type: 'text', text: 'Error occurred' }], isError: true }

// Good: actionable error
return {
  content: [
    {
      type: 'text',
      text: `File "${path}" not found. Check that the path is absolute and the file exists. Available files in the directory: ${availableFiles.join(', ')}`,
    },
  ],
  isError: true,
}
For a deeper look at error design for AI tools, see Writing Effective Tools for AI Agents.
Putting It All Together
Let's build a complete MCP server that combines multiple SDK features into a single, realistic project: a Knowledge Base Server that manages documents.
This example demonstrates tools, resource templates, prompts, logging, and error handling working together:
import { McpServer, ResourceTemplate } from '@modelcontextprotocol/sdk/server/mcp.js'
import { McpError, ErrorCode } from '@modelcontextprotocol/sdk/types.js'
import { z } from 'zod'

// In-memory document store
interface Document {
  id: string
  title: string
  content: string
  tags: string[]
  createdAt: string
  updatedAt: string
}

const documents = new Map<string, Document>()

export function getServer() {
  const server = new McpServer(
    { name: 'knowledge-base', version: '1.0.0' },
    { capabilities: { logging: {} } }
  )

  // --- Tools ---

  server.registerTool(
    'search_documents',
    {
      description: `Search the knowledge base for documents matching a query.
Returns matching documents with their IDs, titles, and relevance snippets.
Use this to find documents before reading their full content via resources.`,
      inputSchema: {
        query: z.string().min(1).describe('Search query'),
        tags: z.array(z.string()).default([]).describe('Filter by tags'),
        limit: z.number().int().positive().max(50).default(10).describe('Max results'),
      },
      annotations: { readOnlyHint: true },
    },
    async ({ query, tags, limit }, { log }) => {
      log.info(`Searching for: "${query}" with tags: [${tags.join(', ')}]`)

      const results = Array.from(documents.values())
        .filter((doc) => {
          const matchesQuery =
            doc.title.toLowerCase().includes(query.toLowerCase()) ||
            doc.content.toLowerCase().includes(query.toLowerCase())
          const matchesTags = tags.length === 0 || tags.some((t) => doc.tags.includes(t))
          return matchesQuery && matchesTags
        })
        .slice(0, limit)

      log.info(`Found ${results.length} results`)

      return {
        content: [
          {
            type: 'text',
            text:
              results.length > 0
                ? results
                    .map((doc) => `[${doc.id}] ${doc.title} (tags: ${doc.tags.join(', ')})`)
                    .join('\n')
                : 'No documents found. Try broadening your search query or removing tag filters.',
          },
        ],
      }
    }
  )

  server.registerTool(
    'create_document',
    {
      description: 'Create a new document in the knowledge base',
      inputSchema: {
        title: z.string().min(1).describe('Document title'),
        content: z.string().min(1).describe('Document content (markdown supported)'),
        tags: z.array(z.string()).default([]).describe('Tags for categorization'),
      },
      annotations: { readOnlyHint: false },
    },
    async ({ title, content, tags }, { log }) => {
      const id = `doc_${Date.now()}`
      const now = new Date().toISOString()

      const doc: Document = { id, title, content, tags, createdAt: now, updatedAt: now }
      documents.set(id, doc)

      log.info(`Created document: ${id} - "${title}"`)
      server.sendResourceListChanged()

      return {
        content: [
          {
            type: 'text',
            text: `Document created successfully.\nID: ${id}\nTitle: ${title}\nTags: ${tags.join(', ') || 'none'}`,
          },
        ],
      }
    }
  )

  // --- Resources ---

  server.registerResource(
    'document',
    new ResourceTemplate('kb://documents/{documentId}', {
      list: async () =>
        Array.from(documents.values()).map((doc) => ({
          uri: `kb://documents/${doc.id}`,
          name: doc.title,
        })),
    }),
    {
      description: 'Full document content by ID',
      mimeType: 'text/markdown',
    },
    async (uri, { documentId }) => {
      const doc = documents.get(documentId)
      if (!doc) {
        throw new McpError(ErrorCode.InvalidParams, `Document "${documentId}" not found`)
      }

      return {
        contents: [
          {
            uri: uri.href,
            mimeType: 'text/markdown',
            text: `# ${doc.title}\n\n**Tags:** ${doc.tags.join(', ') || 'none'}\n**Created:** ${doc.createdAt}\n**Updated:** ${doc.updatedAt}\n\n---\n\n${doc.content}`,
          },
        ],
      }
    }
  )

  // --- Prompts ---

  server.registerPrompt(
    'summarize-document',
    {
      description: 'Generate a concise summary of a knowledge base document',
      argsSchema: {
        documentId: z.string().describe('ID of the document to summarize'),
        style: z
          .enum(['executive', 'technical', 'bullet-points'])
          .default('executive')
          .describe('Summary style'),
      },
    },
    async ({ documentId, style }) => {
      const doc = documents.get(documentId)
      if (!doc) {
        return {
          messages: [
            {
              role: 'user',
              content: {
                type: 'text',
                text: `Document "${documentId}" not found. Please search for the correct document ID first.`,
              },
            },
          ],
        }
      }

      return {
        messages: [
          {
            role: 'user',
            content: {
              type: 'text',
              text: `Provide a ${style} summary of the following document:\n\n# ${doc.title}\n\n${doc.content}`,
            },
          },
        ],
      }
    }
  )

  return server
}
This server exposes:
- Two tools:
search_documents(read-only with annotations) andcreate_document(with resource change notifications) - One resource template:
kb://documents/{documentId}with a list callback for discovery - One prompt:
summarize-documentwith style options - Logging: Structured log messages throughout tool execution
- Error handling:
McpErrorfor missing resources, actionable messages for empty search results
What's Next?
You now have a complete understanding of the MCP TypeScript SDK. Here's where to go from here:
Build your first server: Use create-mcp-server to scaffold a project and start building. See Create Your First MCP Server in 5 Minutes.
Try FastMCP: If you want even less boilerplate, FastMCP offers a streamlined alternative API. See Getting Started with FastMCP in TypeScript.
Secure your server: Add OAuth 2.1 authentication for production deployments. See Securing MCP Servers with OAuth and Keycloak.
Deploy to the cloud: Take your server from localhost to production on Google Cloud Run. See Deploy Your MCP Server to Cloud Run.
Build an MCP client: Connect your own AI agent to MCP servers. See Implementing OAuth for MCP Clients.
Publish to the registry: Share your server with the community. See How to Publish Your MCP Server to the Official Registry.
Enjoying content like this? Sign up for Agent Briefings, where I share insights and news on building and scaling MCP Servers and AI agents.
Resources
- MCP TypeScript SDK (GitHub) — Official SDK source code and documentation
- MCP Specification — The complete protocol specification
- create-mcp-server (GitHub) — CLI tool for scaffolding MCP servers
- Zod Documentation — Schema validation library used by the SDK
Related Articles
- Create Your First MCP Server in 5 Minutes — Beginner quickstart with create-mcp-server
- Getting Started with FastMCP in TypeScript — Alternative framework comparison
- Securing MCP Servers with OAuth and Keycloak — Add authentication
- Deploy Your MCP Server to Cloud Run — Production deployment
- Writing Effective Tools for AI Agents — Tool design principles
- Implementing OAuth for MCP Clients — Client-side OAuth
- How to Publish Your MCP Server to the Official Registry — Share your server