· 10 min read
Building a Fullstack AI Agent with LangGraph.js and Next.js: MCP Integration & Human-in-the-Loop
Learn how to build a production-ready fullstack AI agent with Next.js and LangGraph.js. This guide covers Model Context Protocol integration for dynamic tool loading, human-in-the-loop approval workflows, and real-time streaming with React Query.
Copy a command, then paste it into the command palette (Ctrl K to open).
Last time, I showed you how to build an AI agent backend with NestJS and LangGraph.js. That article focused on the backend architecture—building a robust API for your AI agents. Today, we're taking it fullstack.
In this guide, you'll learn how to build a complete AI agent application using Next.js and LangGraph.js. We'll cover Model Context Protocol (MCP) integration for dynamic tool loading, human-in-the-loop approval workflows for safe tool execution, real-time streaming with Server-Sent Events and React Query, and persistent conversation memory with PostgreSQL.
The result? A production-ready chat interface where you can add new capabilities to your agent through a web UI—no code changes required.
Why Next.js for AI Agents?
In the previous article, we built a dedicated backend with NestJS. While that's perfect for microservices architectures or when you need a separate frontend, Next.js offers compelling advantages for fullstack AI agent applications:
- A unified stack where frontend and backend live in one codebase with shared TypeScript types between API routes and UI components. This means simplified deployment with a single build process.
- API Routes eliminate the need for a separate backend server, TypeScript-first design provides great type inference, and hot reload works for both frontend and backend code.
If you're building a standalone AI agent application (not integrating with an existing backend), Next.js provides the fastest path from idea to production.
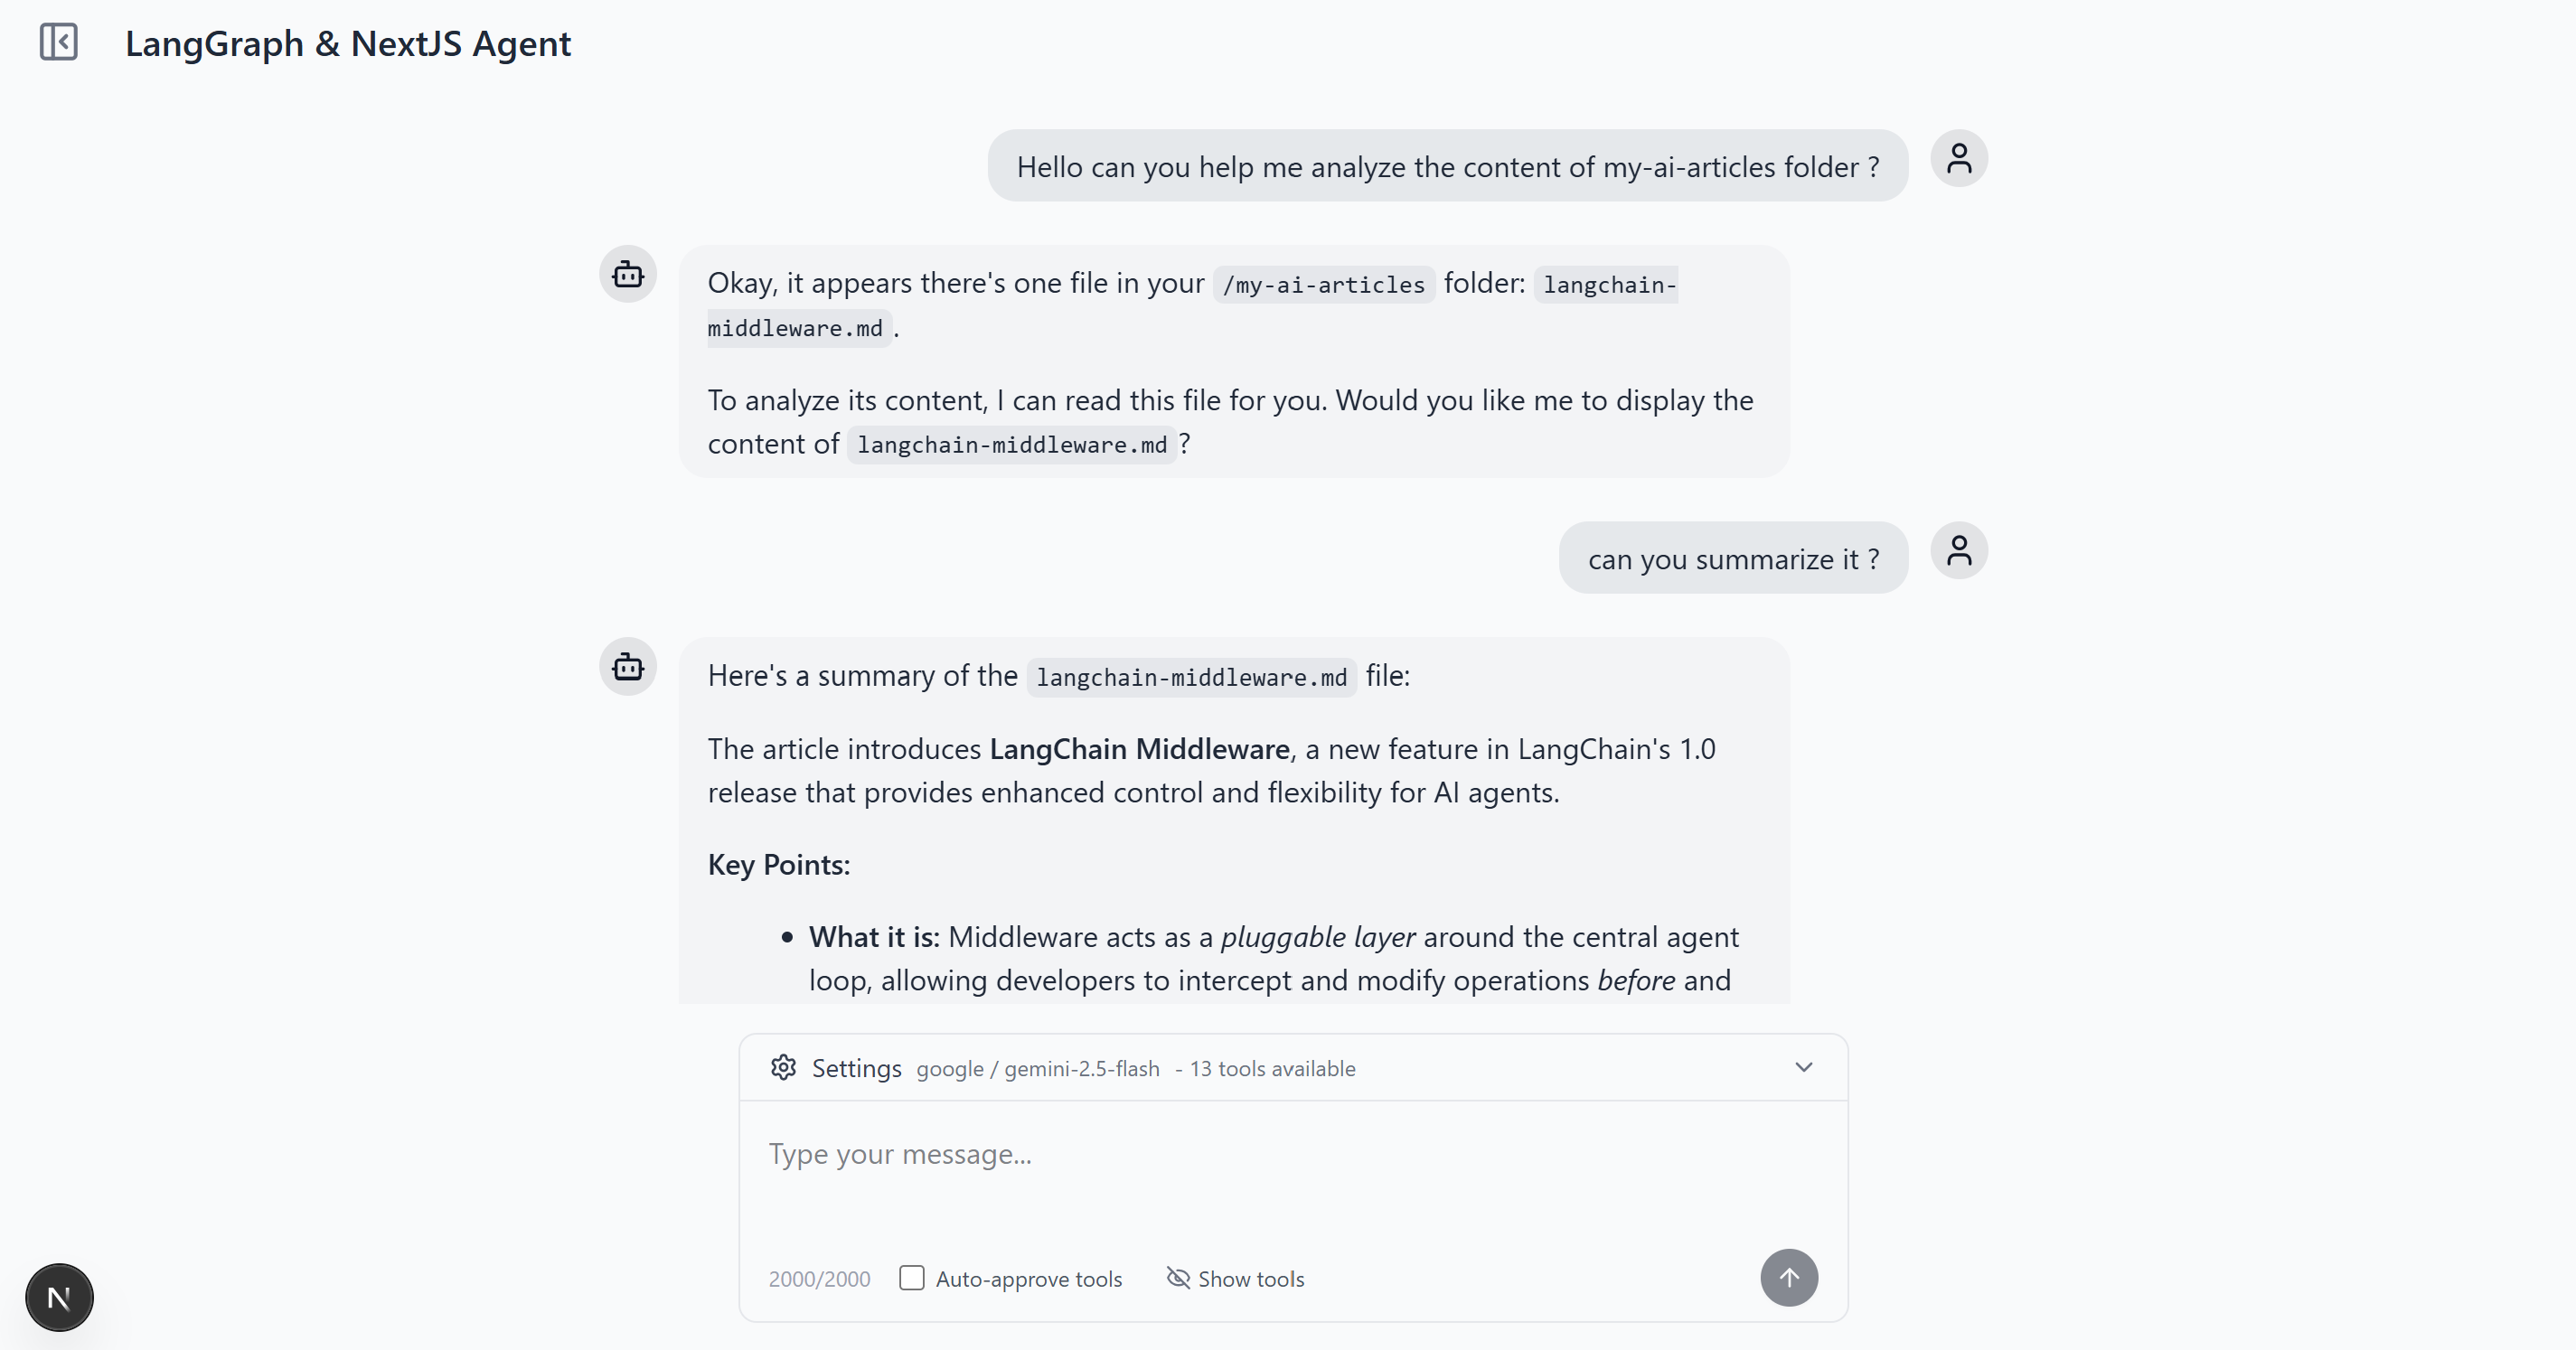
Project Overview & Quick Start
Let's look at what we're building. This is a complete AI agent chat application with dynamic tool management using MCP, a tool approval interface, thread-based conversations with persistent history, and multi-model support.
Quick Start
Prerequisites: You need Node.js 18+, pnpm, and Docker installed.
# Clone the repository
git clone https://github.com/IBJunior/fullstack-langgraph-nextjs-agent.git
cd fullstack-langgraph-nextjs-agent

# Install dependencies
pnpm install

# Start PostgreSQL
docker compose up -d

# Setup database
pnpm prisma:generate
pnpm prisma:migrate

# Configure environment
cp .env.example .env.local
# Edit .env.local with your API keys

# Run development server
pnpm dev
Visit http://localhost:3000 and start chatting!
Your .env.local should include:
DATABASE_URL="postgresql://user:password@localhost:5434/agent_db"
OPENAI_API_KEY="sk-..."
GOOGLE_API_KEY="..."  # Optional
DEFAULT_MODEL="gpt-5-mini"  # Optional
MCP Integration
MCP is the standout feature that sets this implementation apart. If you've built AI agents before, you know the pain: every new tool requires code changes, testing, and redeployment. MCP changes everything.
MCP Overview and Benefits
Model Context Protocol is an open standard for connecting AI agents to external tools and data sources. Think of it as USB for AI agents—a standardized way to plug in new capabilities.
MCP servers provide tools through a consistent interface, whether they're for file system access, database queries, web APIs, or custom integrations with your own services.
Dynamic Tool Loading
In this project, MCP servers are configured through the database and loaded dynamically when the agent initializes. No code changes needed—just add a server through the UI.
Here's the key implementation in src/lib/agent/mcp.ts:
export async function getMCPServerConfigs(): Promise<Record<string, MCPServerConfig>> {
  // Load enabled MCP servers from database
  const servers = await prisma.mCPServer.findMany({ where: { enabled: true } })

  const configs: Record<string, MCPServerConfig> = {}

  // Configure each server based on transport type
  for (const server of servers) {
    if (server.type === 'stdio') {
      configs[server.name] = {
        transport: 'stdio',
        command: server.command,
        args: server.args,
        // ... env configuration
      }
    }
    // ... HTTP transport configuration
  }

  return configs
}

export async function createMCPClient(): Promise<MultiServerMCPClient | null> {
  const mcpServers = await getMCPServerConfigs()

  // Return null if no servers configured
  if (Object.keys(mcpServers).length === 0) return null

  return new MultiServerMCPClient({
    mcpServers,
    throwOnLoadError: false, // Graceful degradation
    prefixToolNameWithServerName: true, // Prevent tool name conflicts
  })
}
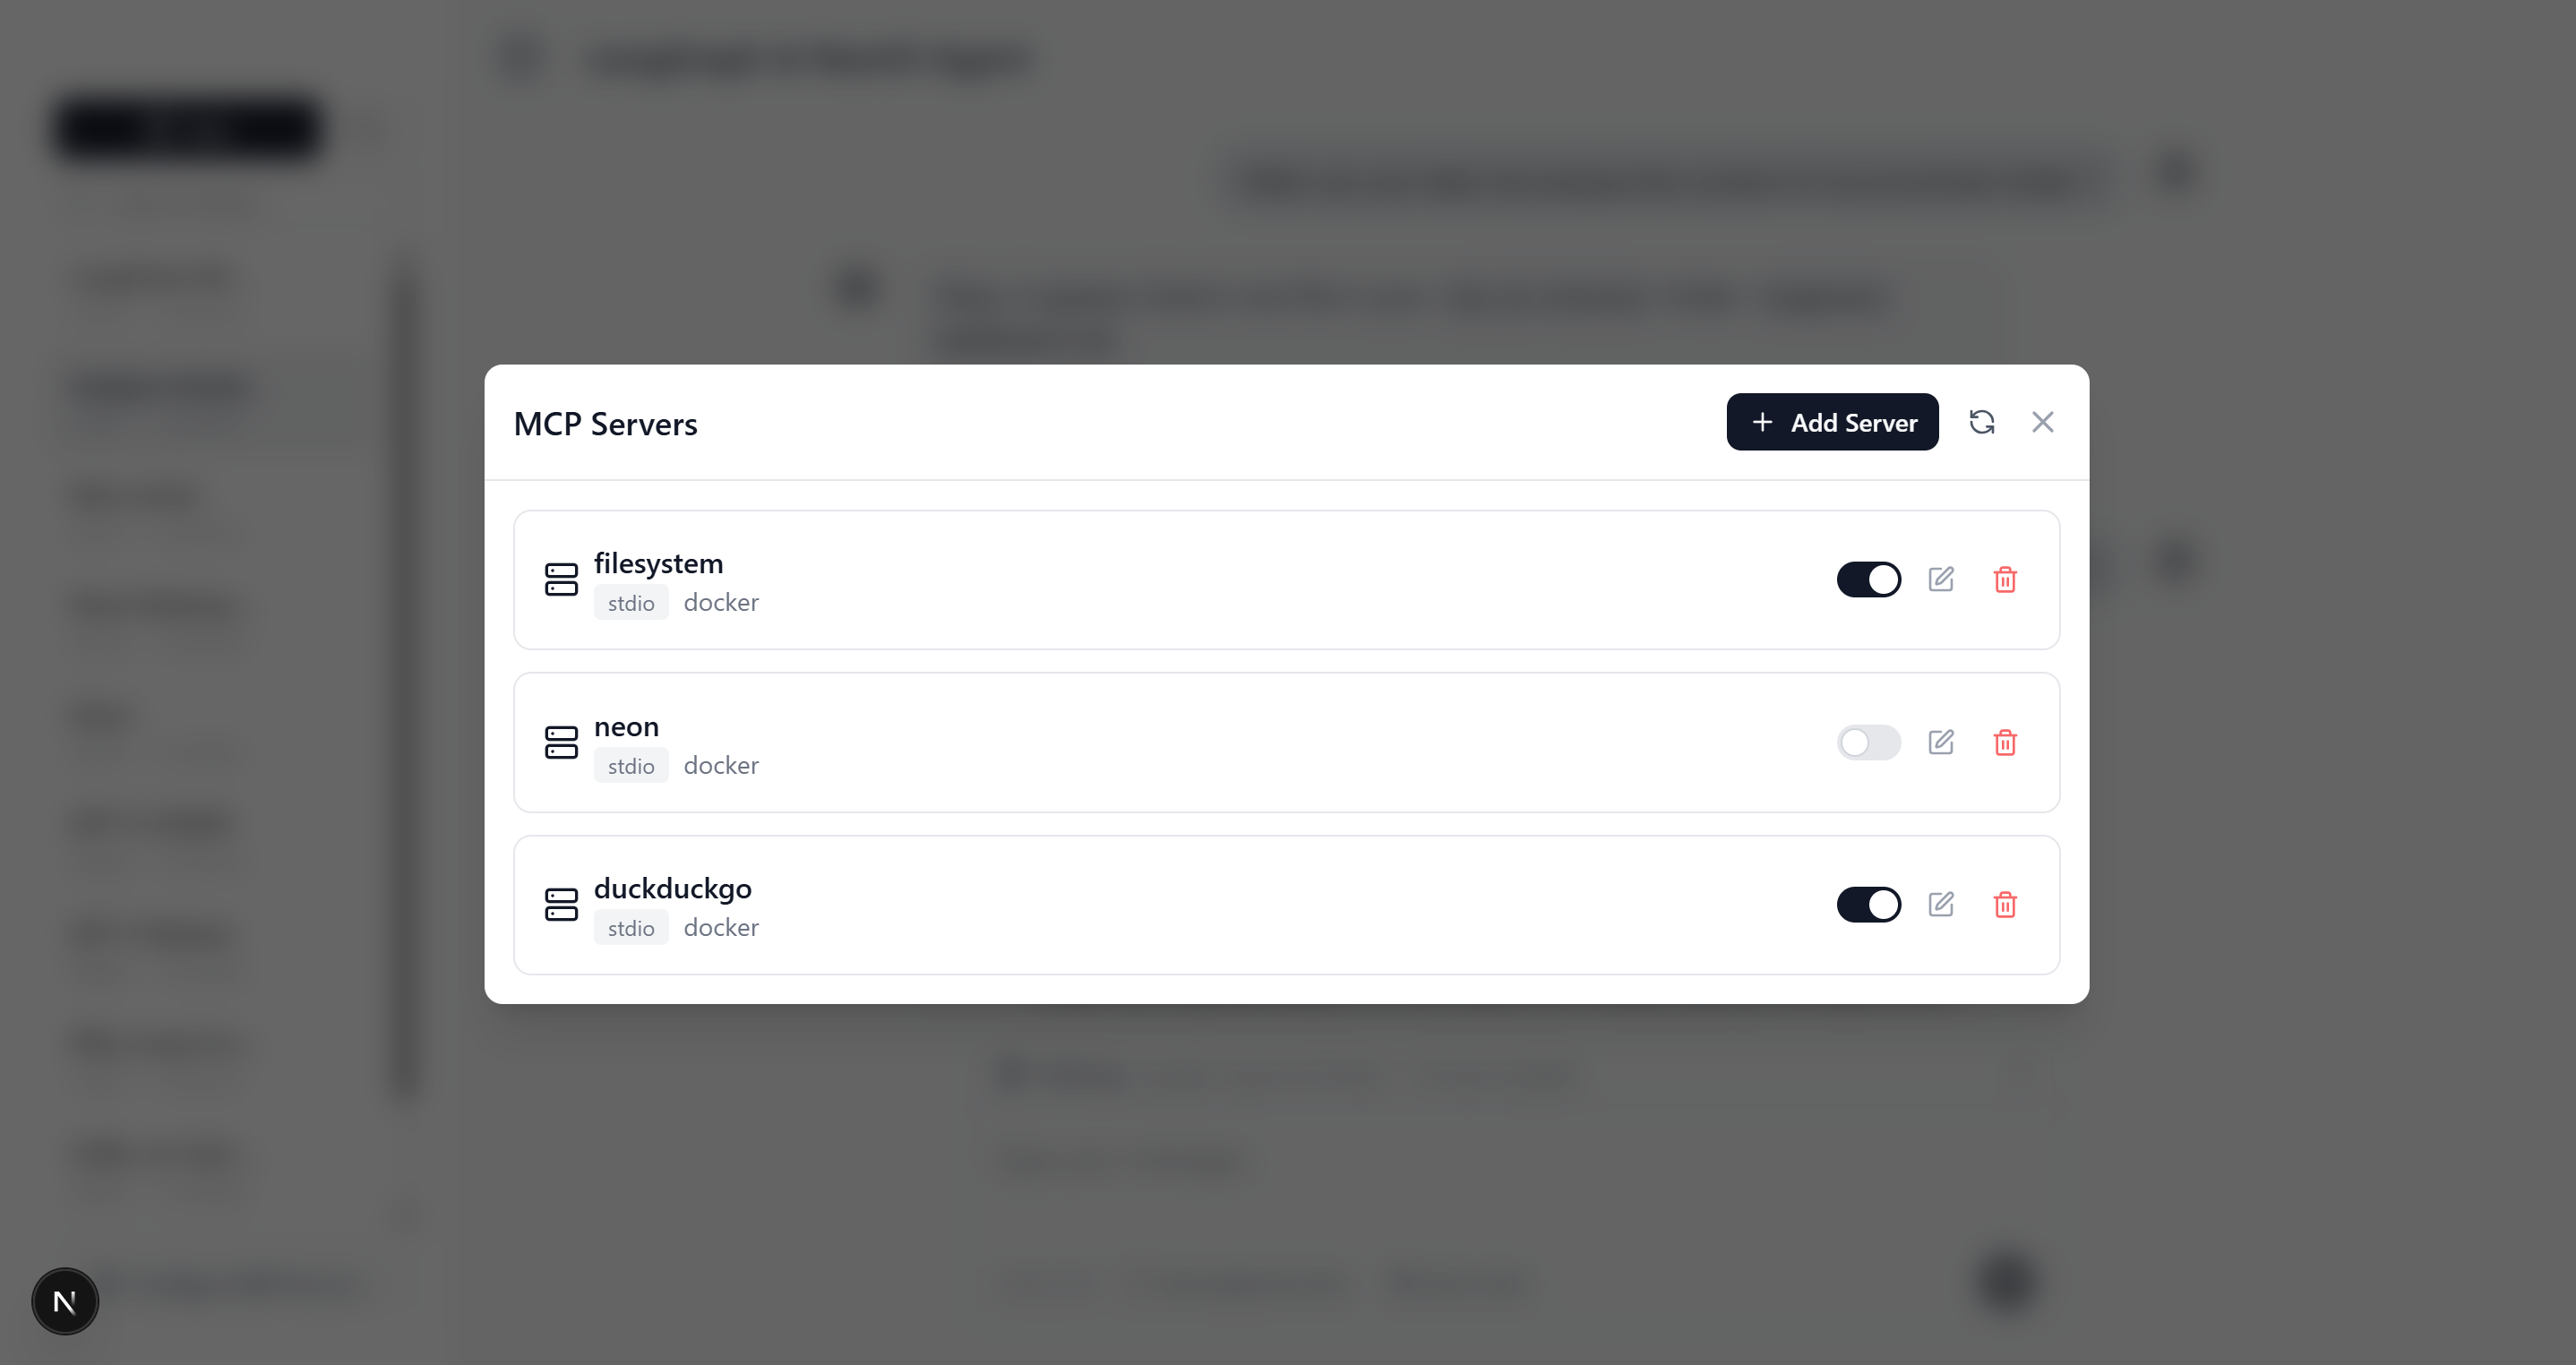
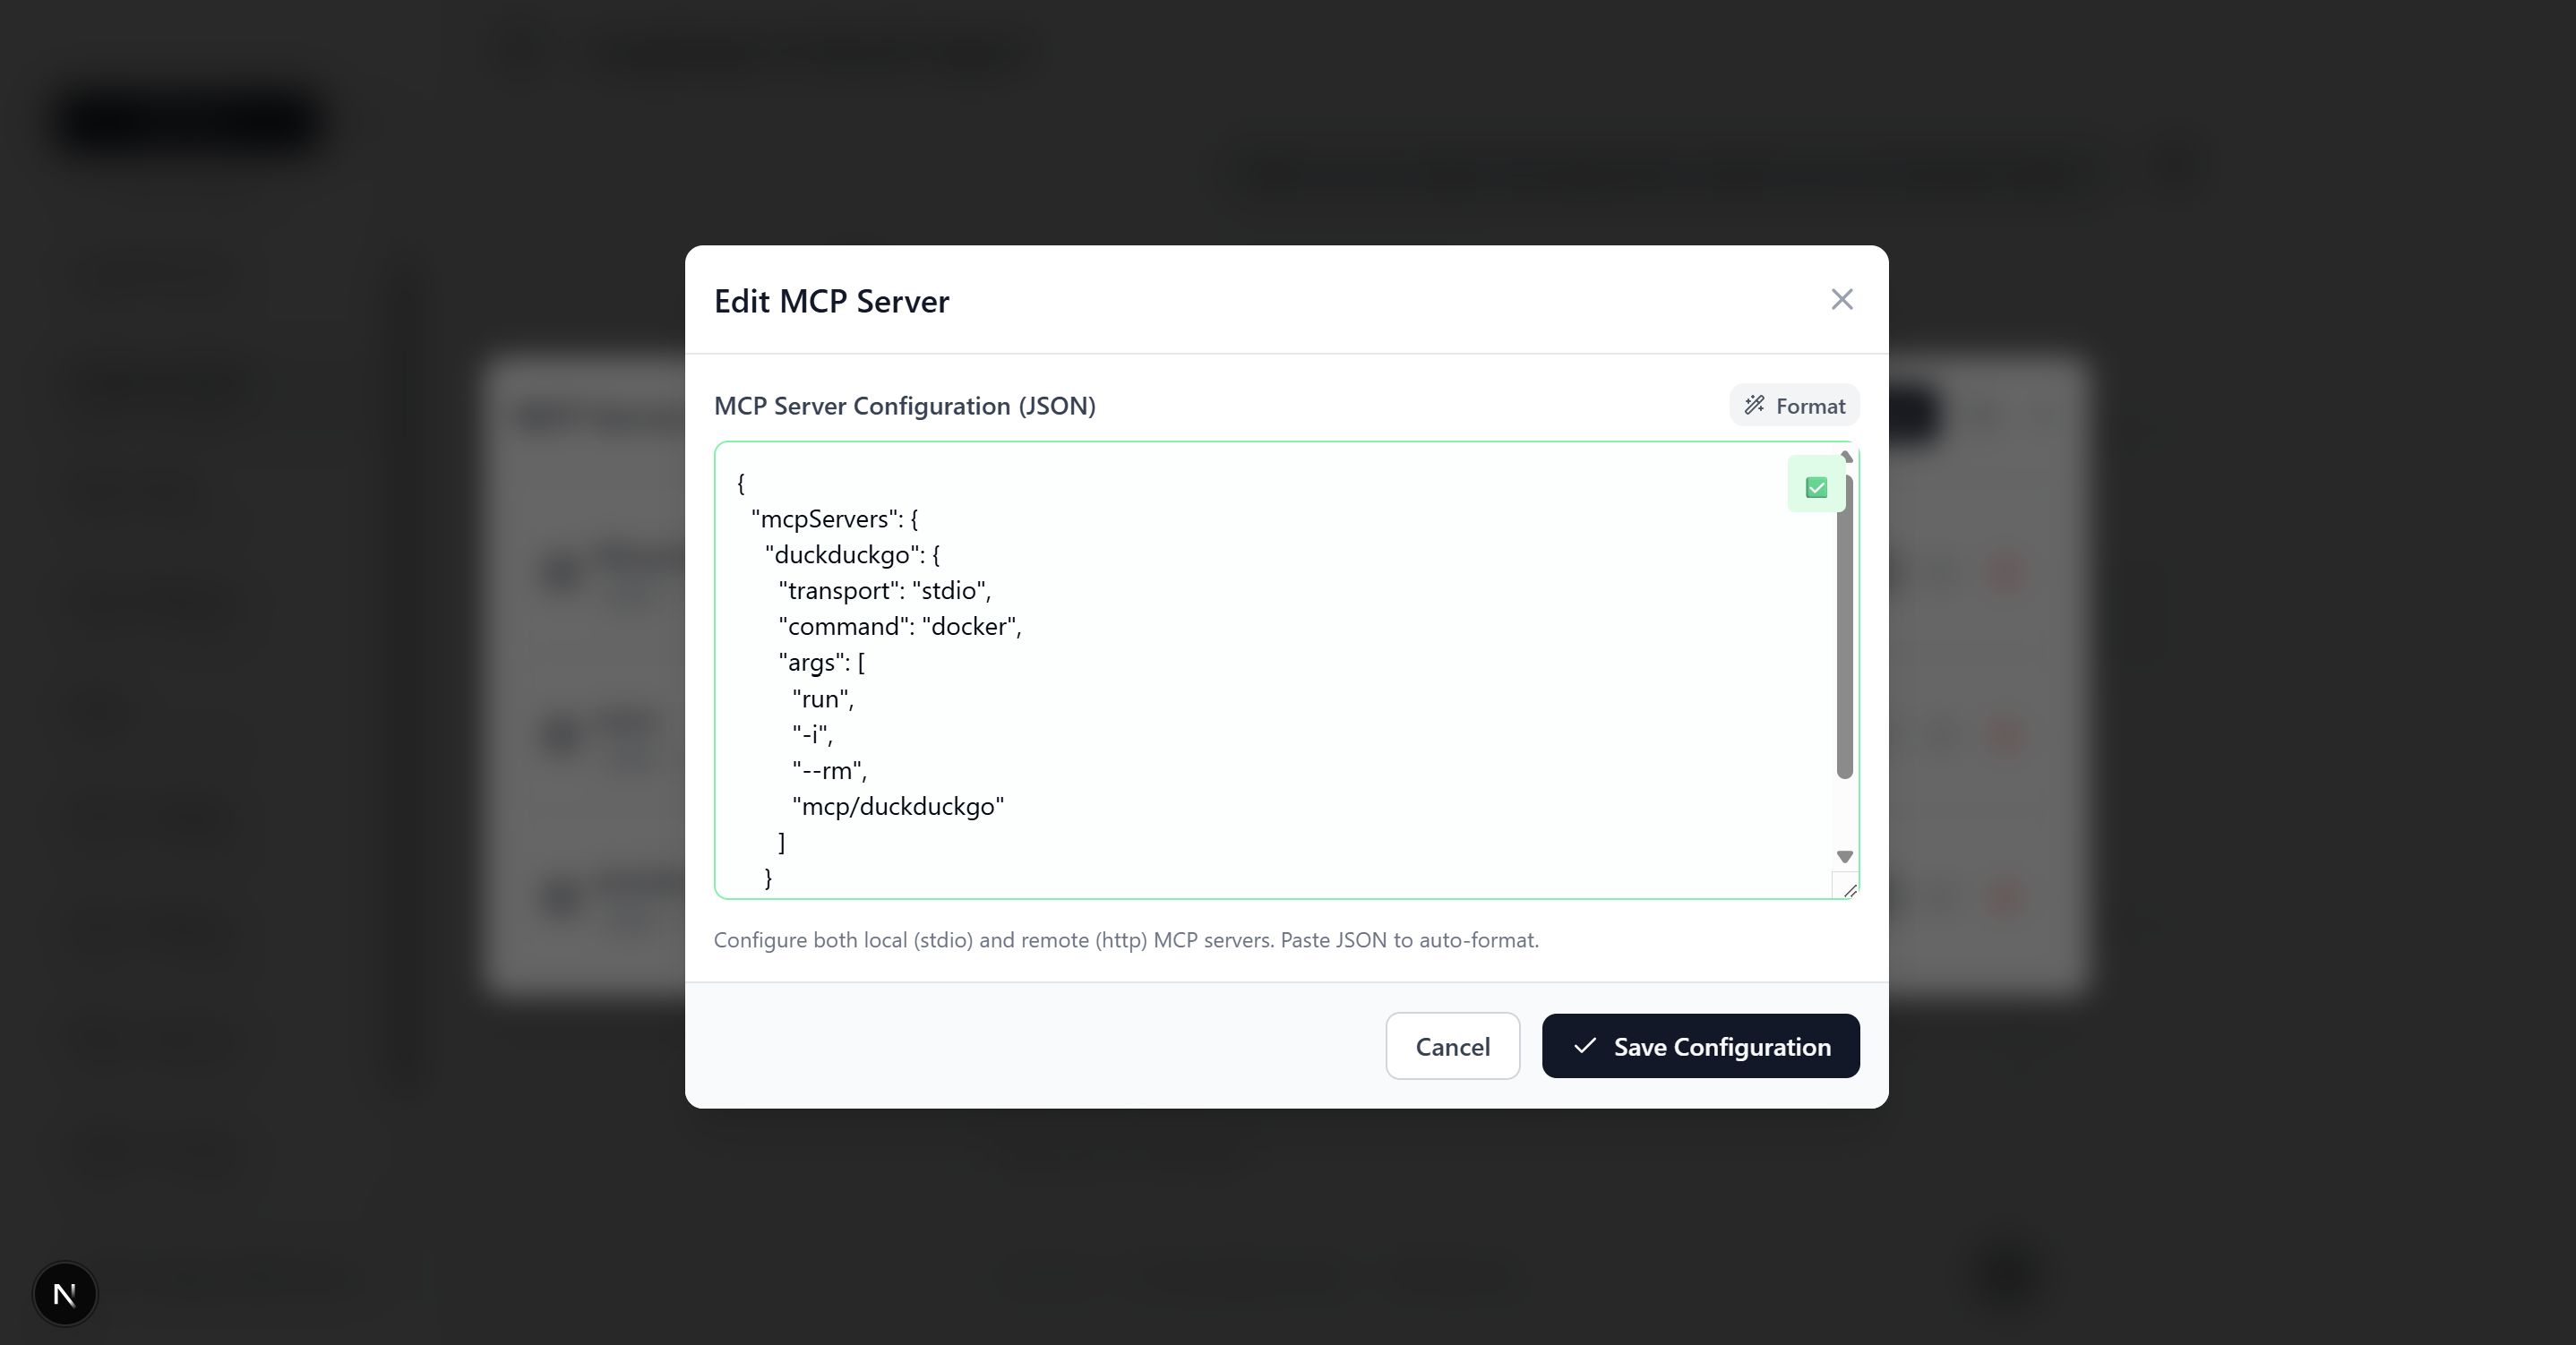
Adding an MCP Server
Want to give your agent access to web search? Just add a server through the settings panel:
This flexibility is game-changing. You can experiment with different tools in production, enable/disable capabilities on the fly, and integrate with any service that provides an MCP interface.
For a catalog of ready-to-use MCP servers, check out the Docker MCP Catalog.
Human-in-the-Loop Tool Approval
Giving AI agents access to tools is powerful and risky at the same time. What if the agent tries to delete important files? Make expensive API calls? Access sensitive data?
Benefits of Tool Approval
In production environments, you need visibility into what tools the agent wants to use, control over potentially dangerous operations, flexibility to modify parameters before execution, and audit trails of approved or denied actions.
Implementation with LangGraph Interrupts
LangGraph provides a powerful interrupt() primitive that pauses agent execution and requests human input. Here's the core implementation:
export class AgentBuilder {
  private async approveToolCall(state: typeof MessagesAnnotation.State) {
    // Skip approval if auto-approve is enabled
    if (this.approveAllTools) {
      return new Command({ goto: 'tools' })
    }

    const lastMessage = messages[messages.length - 1]

    if ('tool_calls' in lastMessage && lastMessage.tool_calls?.length) {
      const toolCall = lastMessage.tool_calls[0]

      // Interrupt and wait for human decision
      const humanReview = interrupt({
        question: 'Is this correct?',
        toolCall: toolCall,
      })

      switch (humanReview.action) {
        case 'continue':
          return new Command({ goto: 'tools' })

        case 'update':
          // Modify parameters before execution
          const updatedMessage = {
            // ... update tool call with modified parameters
          }
          return new Command({ goto: 'tools', update: { messages: [updatedMessage] } })

        case 'feedback':
          // Send denial feedback back to agent
          const toolMessage = new ToolMessage({
            name: toolCall.name,
            content: humanReview.data,
            tool_call_id: toolCall.id,
          })
          return new Command({ goto: 'agent', update: { messages: [toolMessage] } })
      }
    }
  }

  build() {
    const stateGraph = new StateGraph(MessagesAnnotation)
    stateGraph
      .addNode('agent', this.callModel.bind(this))
      .addNode('tools', this.toolNode)
      .addNode('tool_approval', this.approveToolCall.bind(this))
    // ... edge configuration

    return stateGraph.compile({ checkpointer: this.checkpointer })
  }
}
Tool Approval Interface
When the agent requests a tool, the UI shows a detailed approval dialog:
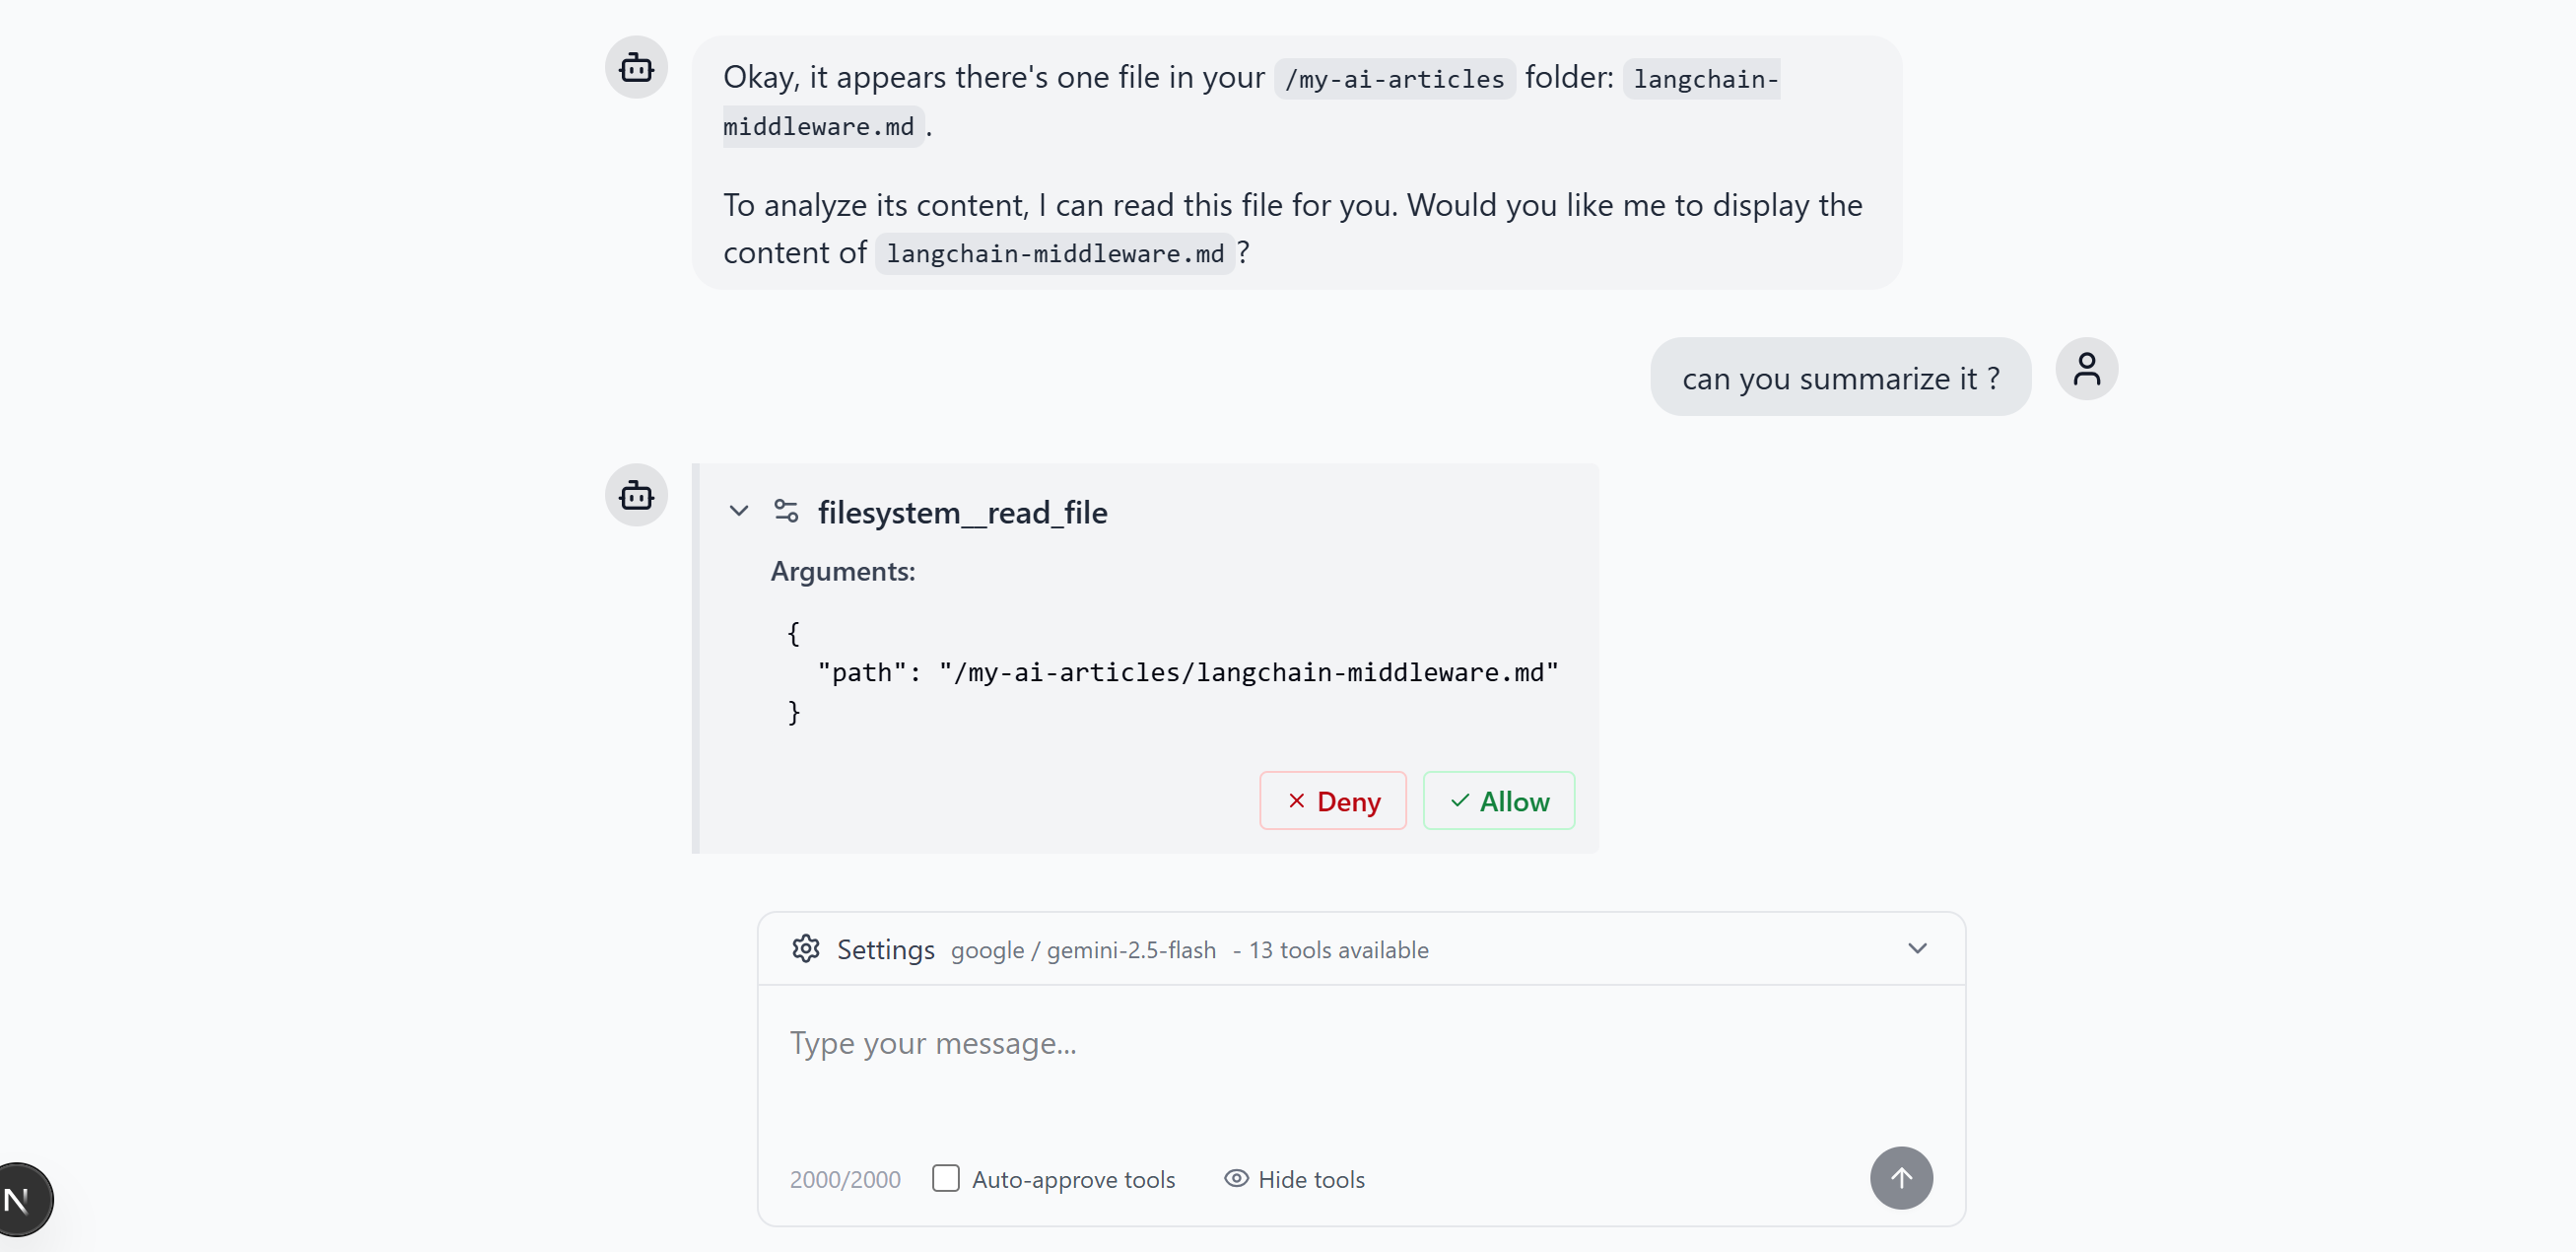
Users can:
- Allow the tool to execute with the proposed parameters
- Deny the tool call with optional feedback
- Modify parameters before execution for advanced use cases.
This workflow strikes a balance between agent autonomy and human oversight, which is perfect for production environments where trust must be earned.
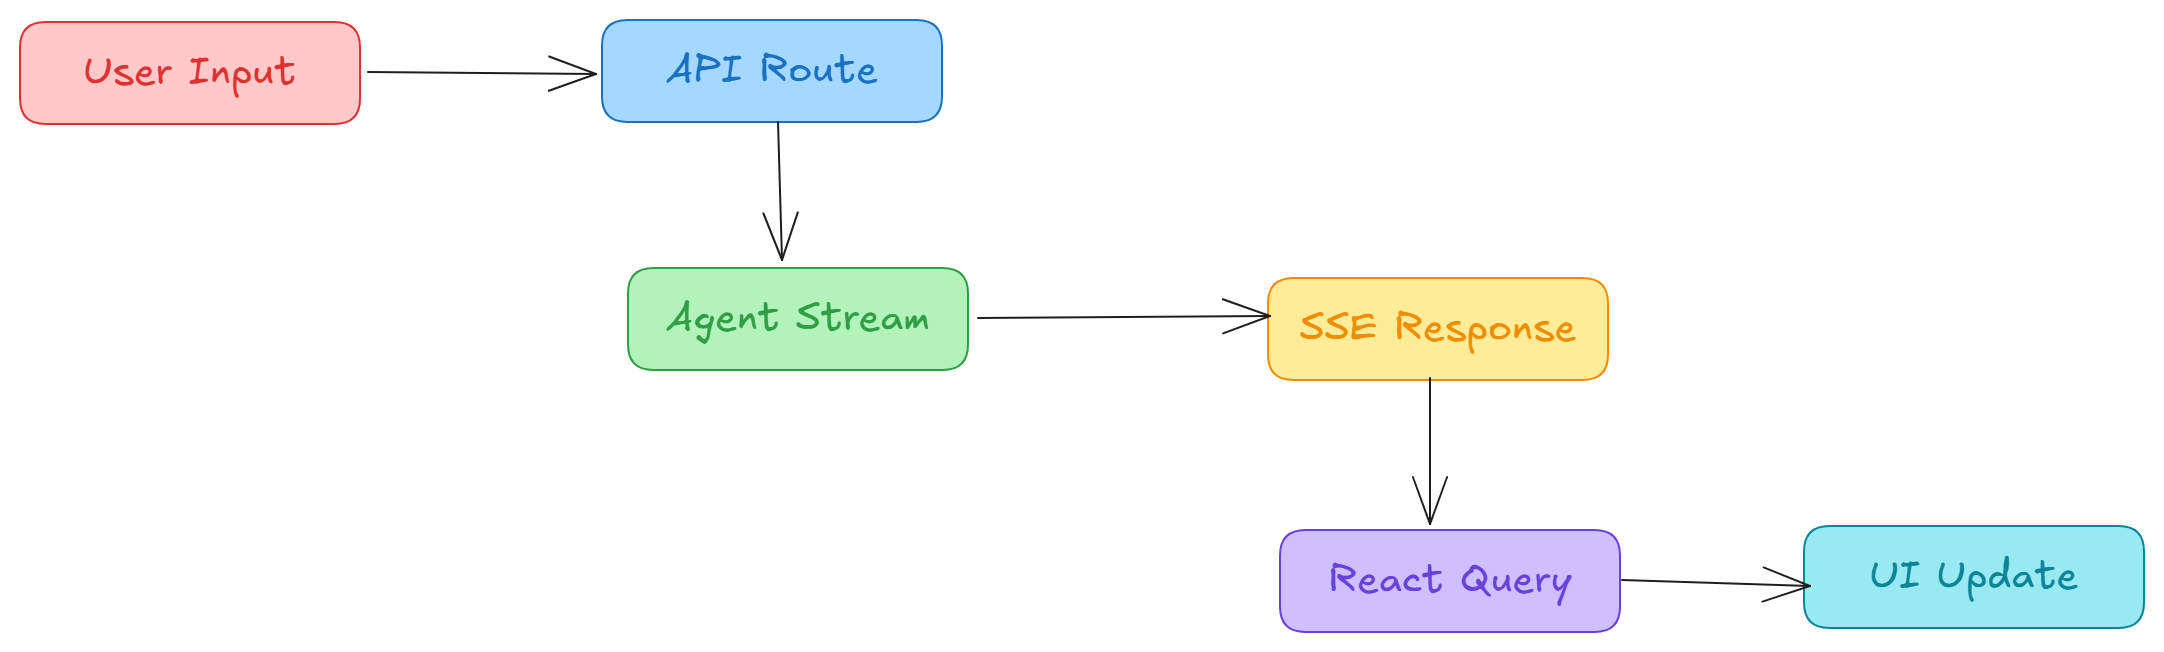
Real-Time Streaming Architecture
Modern AI agents need to feel responsive. Nobody wants to wait 30 seconds staring at a loading spinner for a response.
This project implements real-time streaming using Server-Sent Events (SSE) and React Query for optimistic UI updates.
The Streaming Flow
Backend: Streaming Service
The src/services/agentService.ts handles streaming from the agent:
export async function streamResponse(params: {
  threadId: string
  userText: string
  opts?: MessageOptions
}) {
  // Ensure thread exists and prepare inputs
  await ensureThread(threadId, userText)

  const inputs = opts?.allowTool
    ? new Command({ resume: { action: opts.allowTool, data: {} } })
    : { messages: [new HumanMessage(userText)] }

  const agent = await ensureAgent({
    model: opts?.model,
    // ... other agent configuration
  })

  // Stream with thread-based checkpointing
  const iterable = await agent.stream(inputs, {
    streamMode: ['updates'],
    configurable: { thread_id: threadId },
  })

  async function* generator(): AsyncGenerator<MessageResponse> {
    for await (const chunk of iterable) {
      const processedMessage = processAIMessage(chunk)
      if (processedMessage) {
        yield processedMessage
      }
    }
  }

  return generator()
}
The API route (src/app/api/agent/stream/route.ts) transforms this into SSE:
export async function POST(request: Request) {
  const stream = new ReadableStream({
    async start(controller) {
      const responseGenerator = streamResponse(params)

      for await (const messageResponse of responseGenerator) {
        const data = JSON.stringify(messageResponse)
        controller.enqueue(new TextEncoder().encode(`data: ${data}\n\n`))
      }

      controller.enqueue(new TextEncoder().encode(`event: done\ndata: {}\n\n`))
      controller.close()
    },
  })

  return new Response(stream, {
    headers: {
      'Content-Type': 'text/event-stream',
      'Cache-Control': 'no-cache',
      // ... other SSE headers
    },
  })
}
Frontend: React Query + SSE
The src/hooks/useChatThread.ts hook manages streaming on the client:
export function useChatThread({ threadId }: UseChatThreadOptions) {
  const queryClient = useQueryClient()
  const streamRef = useRef<EventSource | null>(null)
  const currentMessageRef = useRef<MessageResponse | null>(null)

  const sendMessage = useCallback(async (text: string, opts?: MessageOptions) => {
    if (!threadId) return

    // Optimistic UI: Add user message immediately
    const userMessage: MessageResponse = {
      type: 'human',
      data: { id: `temp-${Date.now()}`, content: text },
    }
    queryClient.setQueryData(['messages', threadId], (old = []) => [...old, userMessage])

    // Open SSE stream
    const stream = createMessageStream(threadId, text, opts)
    streamRef.current = stream

    stream.onmessage = (event: MessageEvent) => {
      const messageResponse = JSON.parse(event.data)

      // First chunk: create new message, subsequent: accumulate content
      if (!currentMessageRef.current || /* new message */) {
        currentMessageRef.current = messageResponse
        // Add to React Query cache
      } else {
        // Update existing message content
        currentMessageRef.current.data.content += messageResponse.data.content
        // Update React Query cache
      }
    }
  }, [threadId, queryClient])

  return { messages, sendMessage, approveToolExecution /* ... */ }
}
System Architecture Overview
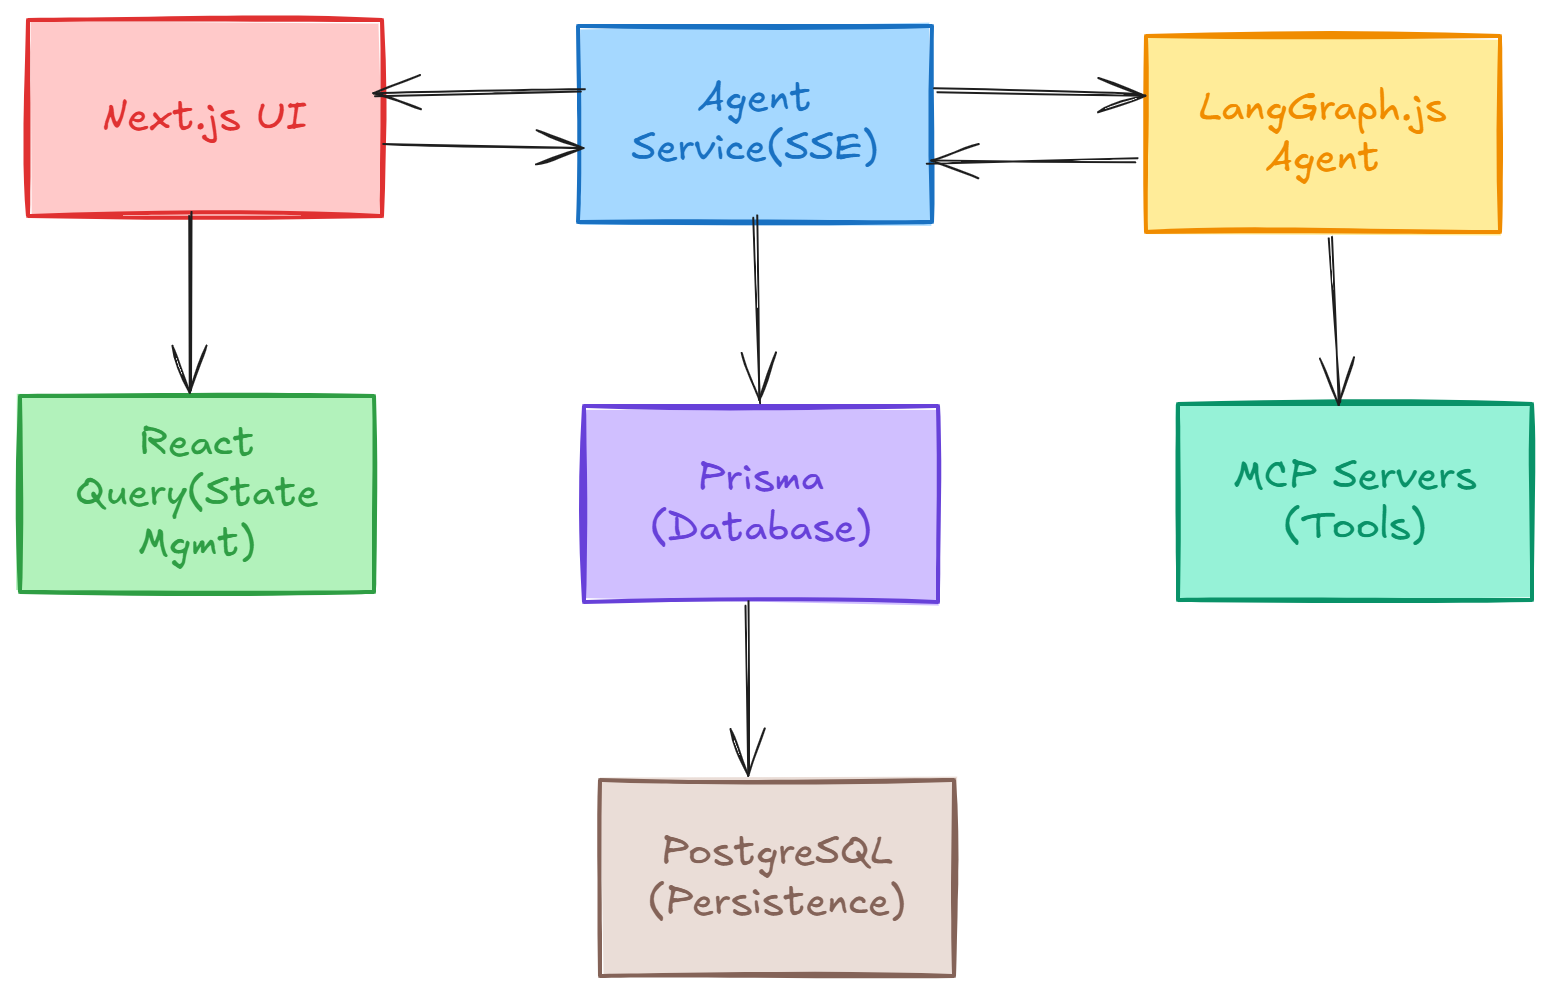
Key Components
The frontend layer includes:
- The main chat interface in
src/components/Thread.tsx - Chat state management in
src/hooks/useChatThread.ts, - Context providers for UI settings.
The backend layer has :
- The SSE streaming endpoint at
src/app/api/agent/stream/route.ts - The Agent orchestration in
src/services/agentService.ts, - The LangGraph StateGraph construction in
src/lib/agent/builder.ts.
The data layer uses:
- Prisma schema for database models
- LangGraph checkpointer for conversation history
- PostgreSQL for persistent storage
The integration layer handles:
- MCP client management in
src/lib/agent/mcp.ts - Conversation history retrieval
- Multi-model support for OpenAI and Google Gemini
For a deep dive into the architecture, including data flows, error handling, and performance optimizations, check out the detailed architecture documentation.
Extending Your Agent
The project is designed for extensibility. Here's how to customize it:
Adding Custom MCP Servers
Create your own MCP server for custom integrations:
// example-server.ts
import { MCPServer } from '@modelcontextprotocol/sdk'

const server = new MCPServer({ name: 'custom-api', version: '1.0.0' })

server.tool('fetch_data', async (params) => {
  // Your custom logic here
  return { result: 'processed data' }
})

server.listen()
Then add it through the UI with command: node example-server.js
Multi-Model Support
Switch between models dynamically:
sendMessage(text, { model: 'gpt-5-mini' }) // or "gemini-2.5-pro"
Custom System Prompts
Modify agent behavior in src/lib/agent/prompt.ts:
export const SYSTEM_PROMPT = `
You are a helpful AI assistant specialized in [YOUR DOMAIN].
Guidelines: Be concise, ask clarifying questions, use tools appropriately.
`
Tool Configuration
Enable auto-approval for development:
const agent = await ensureAgent({
  approveAllTools: process.env.NODE_ENV === 'development',
})
Conclusion
We've built a production-ready fullstack AI agent with dynamic tool loading via Model Context Protocol, human-in-the-loop approval for safe tool execution, real-time streaming with SSE and React Query, persistent conversations with PostgreSQL, and multi-model support for OpenAI and Google.
NestJS vs Next.js: Which Should You Choose?
Choose NestJS when you need a microservices architecture, your frontend is separate (React, Vue, mobile apps), you're integrating with existing Java/Spring-style systems, or you need extensive dependency injection and enterprise patterns.
Choose Next.js when you're building a standalone application, you want rapid development with a unified stack, deployment simplicity is a priority, or your team is frontend-focused with React experience.
Both are excellent choices, the final decision will depend on your architecture and team.
Resources
- GitHub Repository: fullstack-langgraph-nextjs-agent
- Architecture Documentation: ARCHITECTURE.md
- LangGraph.js Docs: https://langchain-ai.github.io/langgraphjs/
- Model Context Protocol: https://modelcontextprotocol.io/
- MCP Server Catalog: Docker MCP Catalog
- MCP v2 changes: MCP v2: What's Changing and Why
Future Roadmap
This project is open source and actively maintained. Future enhancements include multi-agent collaboration, enhanced tool approval UI with parameter editing, agent templates for common use cases, and production deployment guides.
For updates on these features or to share questions and suggestions, feel free to connect with me on LinkedIn or follow me on X.
AGENT BRIEFINGS
Stay measured as the field moves.
What actually matters for building and scaling AI agents in production — and what's just hype. Straight from the work, no filler.
$ subscribe agent-briefings
→ what works in production, what doesn't.
→ frameworks, MCP, evals, managed services.
→ signal over hype.